Milestone

9 nov

From now on, you can get your daily dose of ‘Julienne’ on http://silkedesaever.be/julienne/

Feel free to bookmark the new address 🙂


Pasta Pesto

8 nov

Since I’m stuck at home with the flu, and don’t have the courage or energy to cook/bake anything decent, there’ll be some easy and quick recipes on here the coming days…

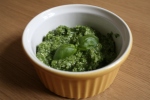
I love pesto, it gives me an instant summer/vacation vibe… This is technically speaking pistou, the French version of pesto, because there are no pine nuts involved. I like pine nuts, but they’re kind of expensive so I just omitted them, and the pesto/pistou still turned out great.

Pasta Pesto

Ingredients (for 2 people)

  • 1 package (250g) filled tortellini (I used 4 cheeses)
  • 10g fresh basil
  • 25g aragula
  • 2 garlic cloves, finely chopped
  • 15g hard Italian cheese, grated (I used Grana Padano)
  • 3 Tbsp olive oil
  • 1/2 tsp salt
  • about 25g aragula for garnishing
  • about 1 Tbsp of grated cheese for garnishing

Directions

  • Cook the tortellini according to the instructions on the package
  • Blend the basil, the garlic and 1 tablespoon of olive oil in a food processor until it forms a smooth paste (I used a tall measurement cup and an immersion blender instead)
  • Add the grated cheese and stir well until you become a homogeneous paste
  • Dilute with the rest of the olive oil (I think I used about 2,5 tablespoons instead of 3) and stir again
  • Serve the tortellini with the pesto, the aragula and some grated cheese

Source: adapted from De Kooktips

Thai Coconut Curry Soup

6 nov

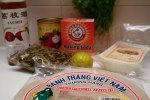
After work, I went to a cute little Asian shop on the other side of town. It’s an amazing place where I always find the obscure ingredients that I find nowhere else. I don’t go there very often because I always buy much more than I intended… But inspiration has been found, so next week there’ll be some more Asian dishes on the menu!

On the picture you’ll see my catch: lychee wine, rice paper, baking soda, dried lime leaves, tofu, canned lychees on syrup, cilantro leaves and a lime.

The curry soup turned out really good: a beautiful balance of sour, salty and spicy. That’s what the Thai kitchen is known for, and it’s a winner combo!
This soup is the ideal comfort food for a night in, when it’s cold and dark outside… like chicken soup, but better, much better!

Thai Coconut Curry Soup

Ingredients (for 2 people)

  • 1 can (400g) coconut milk
  • 1 small Tbsp Thai curry paste
  • 250ml vegetable broth
  • 1 carrot, cut lengthwise in half, and sliced (0,5cm)
  • 1/2 red bell pepper, chopped
  • 1/2 zucchini, cut lengthwise in half, and sliced (0,5cm)
  • 1/2 onion, sliced
  • 4 dried lime leaves
  • 1 Tbsp soy sauce
  • the juice of 2 limes
  • 2 cm fresh ginger, grated
  • 125g rice noodles
  • 1 bunch cilantro leaves, rinsed well
  • salt
  • 2 scallions, chopped

Directions

  • Scoop the thick coconut cream from the top of the can into a large stockpot set over a medium heat
  • Melt the cream, add the curry paste and stir for a few minutes until they begin to sizzle
  • Add the coconut juice from the can along with the vegetable broth, carrot, bell pepper, zucchini, onion, lime leaves, soy sauce and lime juice
  • Grate the fresh ginger into the broth
  • Simmer for 20 minutes or so
  • Take out the lime leaves
  • Add the rice noodles, gently pushing them beneath the surface of the broth
  • Turn off the heat and let stand until the noodles soften, about 5 minutes. Rice noodles don’t need to simmer like pasta to cook; they simply need to rehydrate in the hot liquid
  • Stir in most of the cilantro leaves
  • Taste and season with a touch more salt as needed
  • Pour into large bowls and garnish with the scallions and remaining cilantro leaves
Source: adapted from Chef Michael Smith

Roasted Brussels Sprouts with Goji berries and Couscous

5 nov
When I grew up, we almost always had a 3 component meal: potatoes, vegetables and meat. But according to me, that’s a tad boring. I prefer a plate with lots of different colours, tastes and textures, all combined into one… Like this dish!
Roasted Brussels Sprouts with Gojiberries and Couscous
Ingredients (for 2 people)
  • 500g Brussels sprouts, tips cut off, discolored leaves removed and sliced in half
  • 1 Tbsp olive oil
  • Salt
  • 40g dried Goji berries
  • 75g crumbled goat cheese
  • 30g walnuts
  • 150g couscous
  • 2 Tbsp honey
  • 2 Tbsp balsamic vinegar
Directions
  • Preheat the oven (and a parchment lined baking sheet) to 275°C, on grill stand
  • Meanwhile, cook the couscous according to the instructions on the package
  • In a medium sized bowl, toss the prepared Brussels sprouts with olive oil and salt. Toss well, so that the sprouts are evenly coated in a thin layer of oil.
  • Once the oven is preheated, get out the baking sheet and pour the Brussels sprouts onto the parchment
  • Put the baking sheet back in the oven and let the Brussels sprouts broil for about 5-10 minutes. Check the sprouts for doneness—their tops should be a little browned and the bottoms caramelized.
  • Meanwhile, toast the walnuts. Just heat them for a couple of minutes over medium heat in a nonstick pan without any oil or fat. Make sure not to let them burn!
  • Toss the couscous, sprouts, Goji berries, crumbled goat’s cheese and toasted walnuts onto a plate and drizzle with balsamic vinegar and honey. Season with salt to taste.

Source: adapted from Cookie and Kate

Dark Chocolate Cupcakes

5 nov

I was craving cupcakes all day long… So when I came home, all I could think about was starting to bake. In the pictures you can see my new cupcake stand, which isn’t very handy but so cute I’ve forgotten about that already.

The frosting didn’t turn out that great, but I think it’s because I used minarine (which means less fat) instead of margarine… So next time I’ll just stick to the recipe! The taste was really good, but normally it has to be pipeable, which wasn’t the case at all.

Also my chocolate abstracts didn’t look a thing like the chocolate abstracts on the ‘how to’-website, but that’s abstract art, right?!

Dark Chocolate Cupcakes

Ingredients (for 9 cupcakes)

Cupcakes

  • 50g margarine
  • 30g bittersweet chocolate, chopped
  • 20g cocoa powder (not the Nesquick-kind)
  • 1 egg
  • 50g cane sugar
  • 1/2 tsp vanilla extract
  • a pinch of salt
  • 50g plain yoghurt
  • 30ml soy milk
  • 55g all-purpose flour
  • 1 tsp baking powder

Frosting

  •  1,5 Tbsp all purpose flour
  • 60ml soy milk (if you use cow’s milk, use 5g more sugar)
  • a few drops of vanilla extract
  • 50g margarine
  • 20g granulated white sugar

Garnish

  • 25g dark chocolate, before hand made into ‘chocolate abstracts’ (How To)

Directions

  • Preheat the oven to 175°C. Line a cupcake pan with baking cup liners
  • Combine margarine, chocolate and cocoa in medium heatproof bowl. Set bowl over saucepan containing barely simmering water (au bain marie). Heat the mixture until the margarine and chocolate are melted and whisk until smooth and combined. Set aside to cool until just warm to the touch
  • Whisk the egg in a medium bowl to combine. Add sugar, vanilla, and salt until fully incorporated
  • Add the cooled chocolate mixture, soy milk and yoghurt and whisk until combined.
  • Sift the flour and the baking powder into the bowl
  • Stir well until you become a homogeneous batter
  • Divide the batter evenly among the cupcake pan cups
  • Bake about 15 minutes, or until a toothpick inserted into the center of the cupcakes comes out clean
  • Let the cupcakes cool down completely before frosting them
  • Meanwhile, make the frosting: in a small saucepan, whisk flour into milk and heat, stirring constantly, until it thickens (around 5 minutes). Be careful not to burn it
  • Remove from the heat and let it cool to room temperature
  • Stir in the vanilla extract. This mixture must be completely cooled in order for the frosting to work
  • While the mixture is cooling, cream the margarine and sugar together until light and fluffy
  • Then add the cooled milk/flour/vanilla mixture and beat with a mixer until it all combines and resembles whipped cream. If it’s not looking like whipped cream, keep on whipping
  • Spread the frosting onto the cooled cupcakes, and garnish with the chocolate abstracts

Source:
– cupcakes: adapted from Brown Eyed Baker
– frosting: adapted from The Girl Who Ate Everything
– chocolate abstracts: HWTM

Menu week 45

4 nov


– Monday:
Roasted Brussels Sprouts with Goji Berries and Couscous

– Tuesday:
Coconut Curry Soup

– Wednesday:
Homemade Sushi

– Thursday:
Pasta Pesto

– Friday:
Eating out

– Saturday:
Eating out

– Sunday:
Eating out

Risotto Primavera

4 nov

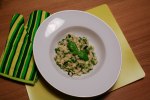
To add some ‘spring feeling’ to this cold autumn weather, I made us a lovely risotto primavera today. Full of healthy green vegetables, and with a creamy yet light mouthfeel.

Be sure to not rinse the rice! This way you’ll rinse away the starch, and let that be the part that’s needed to create the creamy texture of the risotto. Just throw it into the pan, and let the starch do its work!
There’s also a misunderstanding about risotto: a lot of recipes tell you to stir constantly, but that’s really intensive and unnecessary. Just give the rice a good stir each time you add fresh stock, and let the heat do the rest.

Enjoy, or as the Italians would say: Buon appetito!

Risotto Primavera

Ingredients (for 2 people)

  • 1 Tbsp olive oil
  • 200g peas (I used frozen ones)
  • 200g zucchini, diced (this is about 1/2 zucchini)
  • 1 medium onion, chopped
  • 3 small garlic cloves
  • 175g risotto rice (Arborio or Carnaroli)
  • 750 ml stock, boiling (I used vegetable)
  • 2 scallions, chopped
  • 2 Tbsp margarine
  • 5 Tbsp hard Italian cheese, grated (eg. Parmeggiano or Grana Padano)
  • pepper
  • some fresh basil leaves for garnishing

Directions

  • Heat the olive oil in a medium saucepan over medium heat
  • Add the zucchini and peas, and sautĂ© for 5 to 7 minutes, until tender
  • Set the zucchini and peas aside, in a bowl or on a plate
  • Re-use the saucepan: sautĂ© the onions and the garlic for about 5 minutes
  • Add the rice and stir until the rice becomes a bit transparent
  • Now pour in the boiling vegetable stock, about a glass (150ml) at a time
  • Each time, give the rice a good stir and then wait for the stock to be absorbed before adding more. This process should take 25 to 30 minutes.
  • When you pour in the last bit of stock; also add the scallions, zucchini and the peas
  • When the risotto is done, turn off the heat and stir in the margarine and the grated Italian cheese. Season with pepper to taste
  • Garnish with some fresh basil leaves

Source: adapted from’Vegetarische keuken, meer dan 100 onmisbare recepten’

Wholewheat Raisin Bread

3 nov

Nothing beats the scent of fresh, homemade bread. Okay, except the scent of fresh, homemade cupcakes… But still!

Wholewheat Raisin Bread

Ingredients (for 1 loaf)

  • 300ml luke warm water
  • 3 tsp active dry yeast
  • 250g all purpose flour
  • 200g whole wheat flour
  • 100g old fashioned oats
  • 1 tsp salt
  • 150g raisins

Directions

  • In a small bowl, combine the luke warm water and the yeast. Give it a good stir and set aside for about 5 minutes, until the yeast begins to form bubbles.
  • Sift the all purpose flour, whole wheat flour, oats and salt into a large bowl .
  • Stir in the yeast mixture until the dough is starting to pull away from the bowl (it gets less sticky and is forming a nice ball)
  • Now get the dough out of the bowl and start kneading for about 10-15 minutes.
  • Form a ball with the dough, place it back into the bowl and cover up with a towel.
  • Put aside in a warm place for 1 hour (I always preheat my microwave for a minute and then put my bowl in there).
  • The dough should have doubled in volume after an hour.
  • Add the raisins and knead the dough for another 10 minutes
  • Form the dough into a log and put it in a pan (I used a 23cmx13cm rectangle  one)
  • Cover the pan with a towel and put aside again for about 1 hour.
  • Preheat the oven to 190°C.
  • Bake the bread for 30-40 minutes (until golden and hollow sounding when tapped)
  • Let the bread cool down completely

Source: adapted from Pastry Affair

Carrot Cake

3 nov

This week I had a delicious piece of carrot cake at Hema. But it was a little dry, and if you know me, you’ll see where this is going… I (think I) always know it better so I made my own, moist carrot cake today. I don’t want to brag too much, but this cake is a little masterpiece… I love the mixture of tastes, and the nice texture. And it isn’t too unhealthy so indulge, my friends!

ps: remember my shopping spree in Holland? Check out the pictures, starring my new tea pot and some really cute sprinkles.

Carrot Cake

Ingredients (for 1 cake, 26cm diameter)

Cake

  • 250g applesauce, unsweetened (if you want to use sweetened applesauce, use 50g less sugar)
  • 175g cane sugar
  • 2 eggs
  • 125g grated carrots (about 2 medium carrots)
  • 75g grated coconut
  • 75g chopped nuts
  • 1 tsp vanilla
  • 250g crushed pineapple (not drained!)
  • 250g flour
  • 3 tsp baking powder
  • 1/2 tsp salt
  • 2 tsp cinnamon

Frosting

  • 100g margarine (softened)
  • 250g cream cheese (softened)
  • 1 tsp vanilla
  • 100g powdered sugar

Garnish

  • 2 Tbsp sprinkles

Directions

  • Preheat oven to 175°C
  • Combine the applesauce, sugar, eggs, grated carrots, coconut, chopped nuts, vanilla and crushed pineapple. Stir well
  • Sift in the flour, baking powder, salt and cinnamon and stir softly until combined
  • Pour into a lightly greased 28cm diameter cake tin
  • Bake for 30 minutes or until a toothpick comes out clean
  • Let the cake cool down completely
  • Meanwhile, make the frosting: beat the margarine until pale. Then add the cream cheese and beat until fluffy
  • Add in the vanilla and powdered sugar and beat until nice and smooth
  • Set the frosting aside in the refrigerator until you need it
  • Invert the cooled down cake onto a plate
  • Apply a generous layer of frosting and spread nicely
  • Garnish with the sprinkles (I put an upside down bowl on top of my cake, and scattered the sprinkles around the bowl)
Source: adapted from Mom on Time Out

Pizza with Cherry Tomatoes

3 nov

As much as I love pasta, sometimes I also crave a nice pizza… When we have something to celebrate, we normally go to an authentic Italian restaurant here in Ghent (Il Peperoncino in the St-Pietersnieuwstraat or Picobello in the Belfortstraat, they have the same owner). They don’t speak or understand Dutch very well, but the food is amazing!

Since today is a regular Saturday, we stayed at home and I made us a delicious homemade pizza instead! You can top it with anything you like of course, but I like a simple pizza where you can taste the ingredients. So we stayed with mozarella and cherry tomatoes!

Pizza with Cherry Tomatoes

Ingredients (for 2 pizzas)

Dough

  • 150ml luke warm water
  • 1/2 tsp sugar
  • 2 tsp active dry yeast
  • 150g whole wheat flour
  • 125g all purpose flour
  • 2 tsp olive oil
  • 1/2 tsp salt

Topping

  • 1 can (400g) tomato cubes
  • 200g mozzarella (I used light)
  • 300g cherry tomatoes, different colours, cut into half
  • 4 tsp oregano
  • pepper
  • salt
  • some fresh basil leaves for garnishing

Directions

  • In a small bowl, combine the luke warm water, the yeast and the sugar. Give it a good stir and set aside for about 5 minutes, until the yeast begins to form bubbles.
  • Sift the all purpose flour, whole wheat flour and salt into a large bowl .
  • Stir in the olive oil and the yeast mixture until the dough is starting to pull away from the bowl (it gets less sticky and is forming a nice ball)
  • Now get the dough out of the bowl and start kneading for about 10-15 minutes.
  • Form a ball with the dough, place it back into the bowl and cover up with a towel.
  • Put aside in a warm place for 1 hour (I always preheat my microwave for a minute and then put my bowl in there).
  • The dough should have doubled in volume after an hour.
  • Knead the dough for another 10 minutes
  • Divide the dough into 2 pieces, and roll them out until you have 2 pizza crusts
  • Spread out the pizza crusts onto a parchment
  • Cover the crusts with a towel and set aside again for 30 minutes
  • Preheat the oven (and the baking sheets) to 220°C
  • Get the preheated baking sheets out of the oven
  • Very carefully slide the parchments with the pizza crustst onto the preheated baking sheets (this way the bottom of the crust will get scorched quickly, and you end up with a crunchy crust)
  • Garnish the crusts with the canned tomato cubes, mozzarella, cherry tomatoes, oregano, pepper and salt
  • Bake the pizzas for 15 minutes (until the cheese has melted nicely)
  • Garnish with some basil leaves

Source: adapted from All Recipes